
Due to the first weekend of May being a bank holiday, May's Stampin' Up! Class will be on the second Saturday of the month, 12 May.
Sneak Peeks to follow in due course.
Alex
Showing posts with label Stampin' Up Class. Show all posts
Showing posts with label Stampin' Up Class. Show all posts
Monday, 30 April 2012
Saturday, 31 March 2012
Today's Stampin' Up! Class - 31 March 2012
Today was April's Stampin' Up! Class (a week early due to Easter weekend next weekend). The ladies made two cards using the Trendy Trees stamp set that we briefly used last class for the carrots, see here.
Here are the projects made from today in full:
Card 1

Stamps: Trendy Trees (P.60).
Cardstock: Early Espresso, Very Vanilla, Pool Party, Poppy Parade, Elegant Eggplant and More Mustard.
Inkpad: Early Espresso.
Accessories: 3/16" (5mm) Corner Punch, Stamp-A-Ma-Jig, SU Bone Folder.
Card Size: 4-1/8" x 4-1/8".
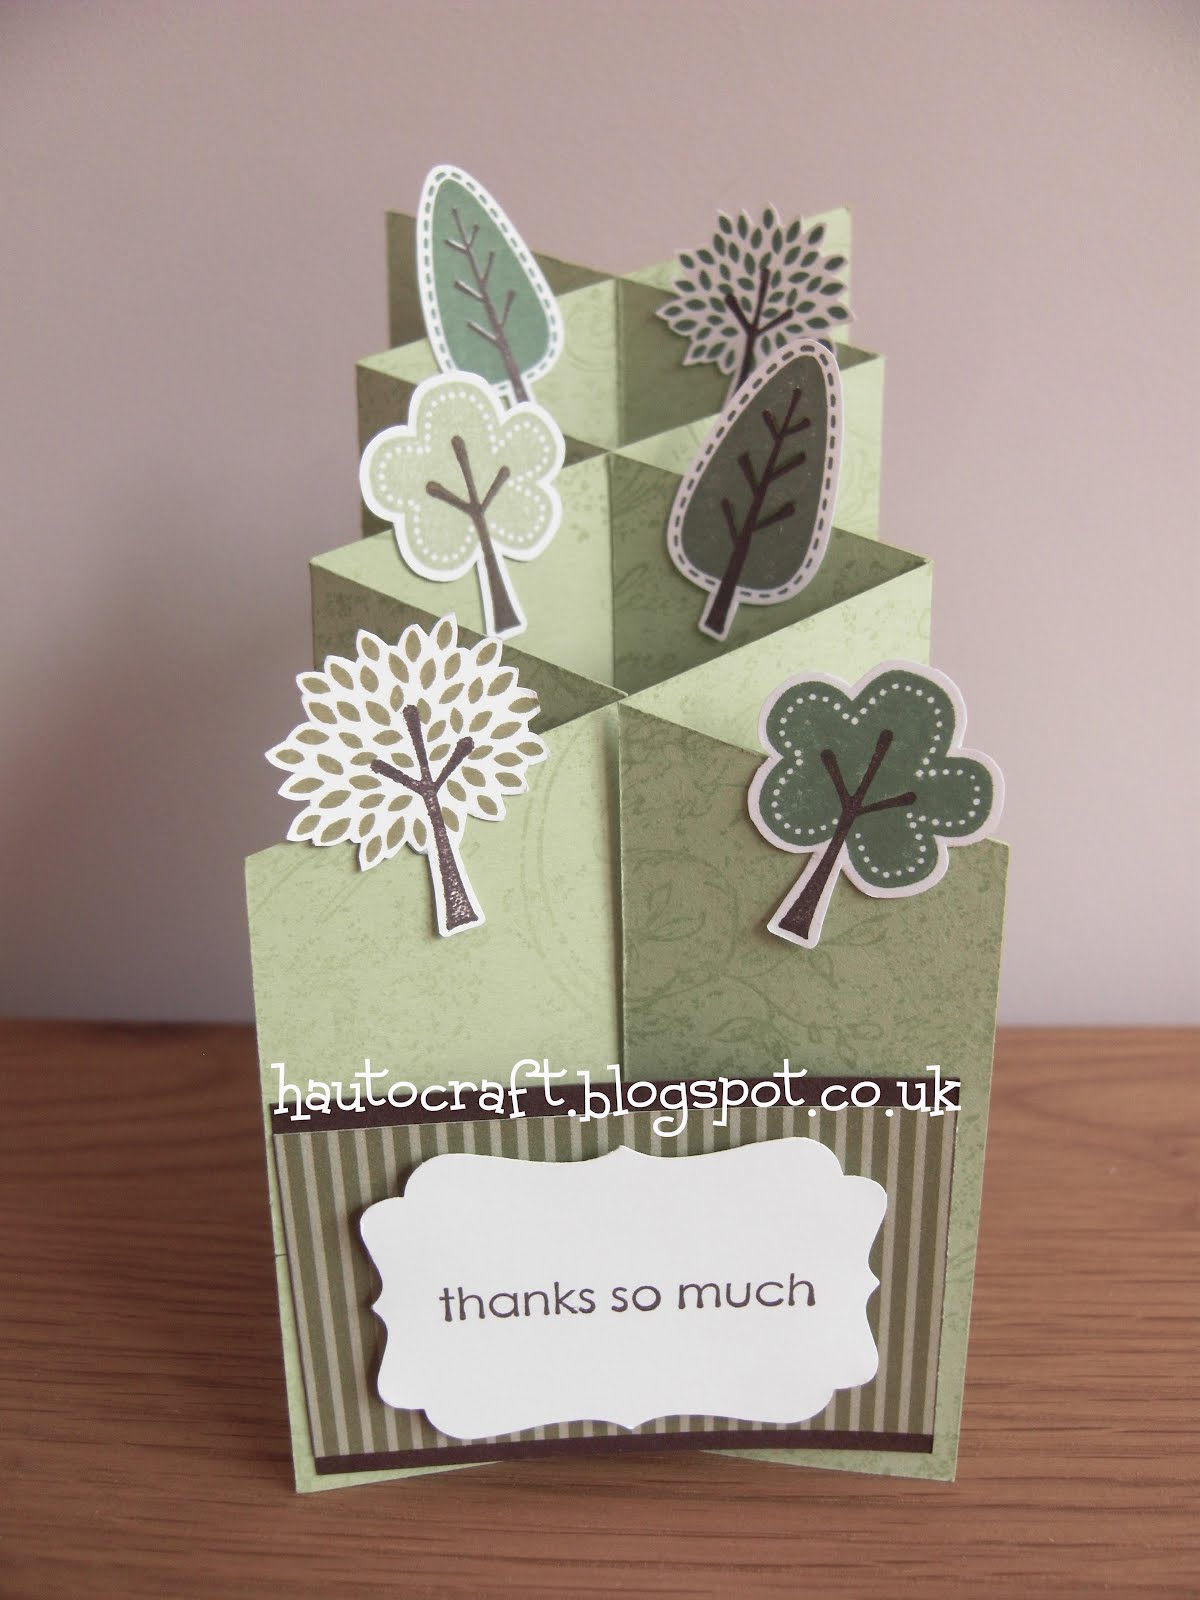
Card 2 - Cascading Card

Stamps: Trendy Trees (P.60) and Very Vintage (Jumbo Wheel, P.75).
Cardstock: Certainly Celery, Early Espresso and Whisper White. DSP - Brights Collection.
Inkpad: Early Espresso, Certainly Celery, Old Olive, Pear Pizzazz, Garden Green and Always Artichoke.
Accessories: Decorative Lable Punch, Stamp-A-Ma-Jig, SU Bone Folder.
Card Size: 6" x 3" (flat).
Cards together:

Thanks for stopping by today, enjoy your weekend.
Alex
Here are the projects made from today in full:
Card 1

Stamps: Trendy Trees (P.60).
Cardstock: Early Espresso, Very Vanilla, Pool Party, Poppy Parade, Elegant Eggplant and More Mustard.
Inkpad: Early Espresso.
Accessories: 3/16" (5mm) Corner Punch, Stamp-A-Ma-Jig, SU Bone Folder.
Card Size: 4-1/8" x 4-1/8".
Card 2 - Cascading Card
Stamps: Trendy Trees (P.60) and Very Vintage (Jumbo Wheel, P.75).
Cardstock: Certainly Celery, Early Espresso and Whisper White. DSP - Brights Collection.
Inkpad: Early Espresso, Certainly Celery, Old Olive, Pear Pizzazz, Garden Green and Always Artichoke.
Accessories: Decorative Lable Punch, Stamp-A-Ma-Jig, SU Bone Folder.
Card Size: 6" x 3" (flat).
Cards together:

Thanks for stopping by today, enjoy your weekend.
Alex
Thursday, 29 March 2012
Next Stampin' Up! Class - 31 March - Sneak Peeks
Hi all,
This weekend is my next Stampin' Up! Class and thought I'd show you some sneak peeks of the projects to be made:
Sneak Peek 1

Sneak Peek 2

See you on Saturday for the projects in full.
Bye for now,
Alex
This weekend is my next Stampin' Up! Class and thought I'd show you some sneak peeks of the projects to be made:
Sneak Peek 1

Sneak Peek 2

See you on Saturday for the projects in full.
Bye for now,
Alex
Monday, 26 March 2012
Next Stampin' Up! Class - 31 March 2012.
Next Stampin' Up! Class is this Saturday, 31 March instead of the first weekend in April being Easter weekend.
Check back this weekend for the projects made.
Enjoy the sunshine!
Bye for now,
Alex
Check back this weekend for the projects made.
Enjoy the sunshine!
Bye for now,
Alex
Saturday, 3 March 2012
Next Stampin' Up! Class - 3 March 2012.
This post will stay at the top till 3 March
Hi all,
My next Stampin' Up! Class is just under a week away and I'm looking forward as it feels like Spring this weekend :)
Check back next Saturday 3 March to see what the ladies have made.
Until then,
Bye for now,
Alex
Saturday, 28 January 2012
Next Stampin' Up! Class - 4 February - Sneak Peeks
Hi all,
The next Stampin' Up! Class is next weekend, so here's a few sneak peeks of what my ladies will be making:
Card 1

Card 2

Thanks for stopping by and look forward to showing you the projects in full after the class on Saturday 4 February.
Bye for now,
Alex
The next Stampin' Up! Class is next weekend, so here's a few sneak peeks of what my ladies will be making:
Card 1

Card 2

Thanks for stopping by and look forward to showing you the projects in full after the class on Saturday 4 February.
Bye for now,
Alex
Tuesday, 3 January 2012
Next Stampin' Up! Class - 7 January 2012 - Sneak Peeks
Can you believe it's the third day of 2012 already?!? Well, time is sure going by and I'm looking forward to tomorrow when the new Spring Mini Catalogue goes live :)
At the weekend is January's Stampin' Up! Class and the ladies will be playing with new goodies from the Catalogue. Here are some sneak peeks below.
Sneak Peek 1

Sneak Peek 2

Stop by on Saturday for the cards in full :)
Bye for now,
Alex
At the weekend is January's Stampin' Up! Class and the ladies will be playing with new goodies from the Catalogue. Here are some sneak peeks below.
Sneak Peek 1

Sneak Peek 2

Stop by on Saturday for the cards in full :)
Bye for now,
Alex
Friday, 30 December 2011
Next Stampin' Up! Class - 7 January 2012
Hope you're having a few goods days after Christmas, and if you've tackled the sales, it's been a success!
Just wanted to drop by to let you know that my next Stampin' Up! Class, the first one for the new year, is on Saturday 7 January. Details will be posted soon with sneak peeks.
If you're local and able to attend, please drop me an email.
Enjoy your day!
Bye for now,
Alex
Just wanted to drop by to let you know that my next Stampin' Up! Class, the first one for the new year, is on Saturday 7 January. Details will be posted soon with sneak peeks.
If you're local and able to attend, please drop me an email.
Enjoy your day!
Bye for now,
Alex
Saturday, 3 December 2011
Today's Class - Polar Party
Hi all,
Today was our final Stampin' Up! Class for this year. Our last Christmas card class focussing on the very cute Polar Party stamp set and the lovely Candy Wrapper Die which fits a Lindt chocolate oh so perfectly :)
Here's what the ladies made today:
Centre Step Card

Stamps: Polar Party (P.20).
Cardstock: Night of Navy, Baja Breeze and Whisper White.
Inkpad: Basic Black. Versamark Stamp Pad.
Accessories: Stampin' Write Marker - Real Red, Wild Wasabi, Pumpkin Pie, Daffodil Delight, Early Espresso and Baja Breeze, Stamp-A-Ma-Jig, Heat & Stick Powder, Dazzling Diamonds, Heat Tool, Dimensionals, Paper Snips and SU Bone Folder.
Card Size: A5.
Candy Wrapper

Stamps: Polar Party (P.20).
Cardstock: Baja Breeze and Whisper White.
Inkpad: Basic Black and Baja Breeze.
Accessories: Big Shot, Bigz L Dies - Candy Wrapper, Oval Punch, Window Sheet, Sticky Strip, Stampin' Write Marker - Real Red, Wild Wasabi and Baja Breeze, Dimensionals, Paper Snips and SU Bone Folder.
Box Size: 3.5" x 1-4/8" x 1-4/8".
Projects Together

Thanks for stopping by. Enjoy your weekend.
Alex
Sunday, 27 November 2011
Next Stampin' Up! Class - 3 December 2011 - Sneak Peeks
Hi all,
Well hope you're well and tucked up warm inside :) The nights are drawing in and I can't believe it's not long and it'll be December!
Been recently prepping for my next Stampin' Up! Class which is being held next weekend, Saturday 3 December, so if you fancy coming along, please let me know.
Here are some sneak peeks of what the ladies will be making next Saturday:
Sneak Peek 1

Sneak Peek 2

See you next weekend for the projects in full.
Bye for now,
Alex
Saturday, 5 November 2011
Stampin' Up! Class - today
Hi all,
Today was November's Stampin' Up! Class. This is the first time we've got together to make things out of the new Idea Book & Catalogue.
So, here are the projects that the ladies made today using Tags Til Christmas stamp set and the lovely Mini Milk Carton Die twice to create this great little box!
Diamond Fold Card

Stamps: Tags Til Christmas, P.24 and Season of Joy, P.25.
Cardstock: Real Red, Old Olive and Very Vanilla.
Inkpad: none.
Accessories: Stampin' Write Markers - Old Olive, Chocolate Chip and Real Red, Decorative Label Punch, Small Oval Punch, Sponge Dauber, Shimmer Paint - Champagne Mist, Stamp-A-Ma-Jig, Multipurpose Liquid Glue, Dimensionals, Paper Snips and SU Bone Folder.
Card Size: tbc.
Mini Milk Carton Box

Stamps: Tags Til Christmas, P.24 and Season of Joy, P.25.
Cardstock: Old Olive, Real Red and Whisper White(I used Whisper White by accident, should be Very Vanilla to match the Diamond Fold Card).
Inkpad: Versamark Stamp Pad.
Accessories: Bigz L Die - Mini Milk Carton, Scallop Square Punch, 5/8" Satin Ribbon - Old Olive, Sponge Dauber, Shimmer Paint - Champagne Mist, Sticky Strip, Mini Glue Dots, Multipurpose Liquid Glue, Paper Snips and SU Bone Folder.
Box Size: tbc.
Projects together:

Here is the Tags Til Christmas stamp set used for these projects from the new Idea Book & Catalogue:
Tags Til Christmas, P.24

Sizzix Bigz L Die - Mini Milk Carton, P.123
 Thanks for stopping by, enjoy the rest of your weekend.
Alex
Next Stampin' Up! Class - 5 November 2011 - Sneak Peeks
This post will stay up at the top ~ Please scroll down for new posts
Hi all,
Just passing by with the details of the next Stampin' Up! Class which will be on Saturday 5 November. Unfortunately, October's Class wasn't to be, so I have carried forward the projects for October's Class for the class in November.
The ladies will play with new goodies from the Catalogue to make a couple of items for Christmas, see sneak peeks below:
Sneak Peak 1

Sneak Peak 2

If you're local and would like to come along for a couple of hours on Saturday 5 November to make some goodies for Christmas, please get in touch with me by email as I have one space available.
Bye for now,
Alex
Saturday, 3 September 2011
Stampin' Up! Class - Today
Hi all,
The ladies enjoyed the Christmas themed class today making a Never Ending Christmas Card and matching Pillow Box Pouch.
Here are the photos of what the Never Ending Card reveals as you keep fliping the card over:
Front of Card

Flip 1 - pulling apart horizontally

Flip 2 - pulling apart vertically

Flip 3 - pulling apart horizontally

Stamps: Contempo Christmas, Delightful Decorations, Season of Joy and Occasional Greetings.
Cardstock: Cherry Cobbler, Very Vanilla. Designer Series Paper - Jolly Holiday.
Inkpad: Cherry Cobbler, Old Olive. Versamark Stamp Pad. Accessories: Rhinestones, Ornament Punch, 3/4" Circle Punch, Gold Cord, Stamp-A-Ma-Jig, Sticky Strip, Multipurpose Liquid Glue, Dimensionals and SU Bone Folder.
Card Size: 6" x 6".
Reminds me of those things you used to make and play with friends in the playground. lol.
Anyway, as this was a time consuming project, the ladies finished off the class with a simple but effective Pillow Box Pouch using the Big Shot and Pillow Box Die from Stampin' Up! :) I'm sure they'll think of something nice to put in there for Christmas.
Projects Together

Okay, hope you enjoyed this post and have a good weekend.
Bye for now,
Alex
Sunday, 14 August 2011
Next Stampin' Up! Class - 3 September 2011 - Sneak Peek
Hi all,
Hope you're well and enjoying your August so far. I've been really organised and excited about September's Stampin' Up! Class, as it's a card technique I've not tried before. Anyway, I got to work recently when the weather was 30 degrees outside and started designing for next month's class a lot more in advance than I normally do, as these next couple of weeks before the class will be busy ones for me.
Anyway, here's a sneak peek of what the ladies have in store for them in a few weeks time at the next Stampin' Up! Class on Saturday 3rd September.
Sneak Peek

Check back on Saturday 3 September for the complete projects in full.
Until then.
Bye for now,
Alex
Tuesday, 9 August 2011
Next Stampin' Up! Class - Saturday 3 September
Fancy coming along to my next Cardmaking Class to make something special for Christmas?
If you're free the first Saturday of September for a couple of hours from 10.15am and would like to craft with some friendly ladies, please feel free to drop me an email.
Sneak Peeks will be revealed soon.
Bye for now,
Alex
Sneak Peeks will be revealed soon.
Bye for now,
Alex
Saturday, 6 August 2011
Today's Stampin' Up! Class - Manhattan Flower Embossing Folder
Hi all,
Another great class with the ladies today, making two cards based on the Manhattan Flower Embossing Folder. These two cards were inspired and CASEd by some examples seen online, colours/sentiments were changed to create the below two cards:
Manhattan Flower Card 1

Stamps: Vintage Vogue (P.62) and Occasional Quotes (P.14 - Hostess Level 3).
Cardstock: Pink Pirouette and Whisper White.
Inkpad: Pretty In Pink.Accessories: Big Shot, Textured Impressions Embossing Folder - Manhattan Flower, 3/8" Taffeta Ribbon - Whisper White, Stamp-A-Ma-Jig, Paper Snips, Mini Glue Dots, Dimensionals and SU Bone Folder.
Card Size: A6
Someone clever has managed to see beyond the Manhattan Flower pattern to the outline of a "dress". See below for the basic outline:

Manhattan Flower Card 2

Stamps: Occasional Quotes (P.14 - Hostess Level 3).
Cardstock: Crumb Cake, Early Espresso and Very Vanilla.
Inkpad: Early Espresso.Accessories: Big Shot, Textured Impressions Embossing Folder - Manhattan Flower, Scallop Edge Border Punch, 5/8" Grosgrain Ribbon - Very Vanilla, Stamp-A-Ma-Jig and SU Bone Folder.
Card Size: A6
This card would be appropriate for most occasions by changing the sentiment whether it be a Happy Anniversary, Thank You, Thinking of You or Birthday card. The themes are endless and so are the colour combinations to create this simple and quick card.
Here are the two cards together:

Thanks for stopping by today, I'm really excited about September's Stampin' Up! Class as I have recently designed it for next month and am chuffed at the end results. Check back at the end of August for sneak peeks.
Enjoy the rest of your weekend.
Bye for now,
Alex
Monday, 1 August 2011
August already - another Stampin' Up! Class
Hi all,
I can't believe we're now in August, the sun has finally appeared at last!
This Saturday is my next Stampin' Up! Class and I can't wait to play with the new embossing folders that came out in the new Mini Catalogue.
Here are a few sneak peeks of what the ladies will be making on Saturday, which will be revealed later that day.
Sneak Peeks


If you fancy coming along and live local, I have one space available. Get in touch if you'd like to join us.
Bye for now,
Alex
Saturday, 9 July 2011
Next Stampin' Up! Class - 9 July 2011 - Sneak Peek
This post shall stay at the top till Friday 8 July
Please scroll down for new posts
Please scroll down for new posts
Hi all,
My next Stampin' Up! Class is being held on the 2nd Saturday for the month of July instead of the 1st.
If you are free and local on Saturday 9 July and fancy coming along to make a couple of cards using goodies from the Mini Catalogue and old favourites from the Idea Book & Catalogue, then please let me know and drop me an email message.
To wet your appetite, here's a sneek peak:

Bye for now,
Alex
Sunday, 3 July 2011
Next Stampin' Up! Class - 9 July 2011 - Sneak Peek Part 2
Hi all,
Hope you're enjoying the sunshine and tennis.
Next weekend is my next Stampin' Up! Class, so here's the second sneak peek as promised...
Sneak Peek 2

If you're local and fancy coming along to my class next Saturday, just let me know by email or telephone.
Until then...
Alex
Hope you're enjoying the sunshine and tennis.
Next weekend is my next Stampin' Up! Class, so here's the second sneak peek as promised...
Sneak Peek 2

If you're local and fancy coming along to my class next Saturday, just let me know by email or telephone.
Until then...
Alex
Saturday, 4 June 2011
Stampin' Up! Class - Today
Hi all,
Hope your week has been a good one and you're having a good weekend so far :)
Today the ladies have been busy making a Birthday Card and a Top Note Die Easel Post-It Note Holder using the lovely and bright Sunny Garden DSP.
Below are the samples that I made for today's class using a different colour combination based on Elegant Soiree DSP. The ladies followed and completed the same projects in the alternative colour combination of Poppy Parade, Pear Pizzazz and Whisper White, example towards the end of the post from one of today's ladies.
Birthday Card

Stamps: Simply Said (P.47) and Something To Celebrate (Level 2 Hostess - Mini Catalogue, P.5).
Cardstock: Chocolate Chip and Very Vanilla. DSP - Elegant Soiree.
Inkpad: Chocolate Chip. Versamark Stamp Pad.
Accessories: Big Shot, Top Note Die, 5/8" Grosgrain Ribbon - Very Vanilla, Stampin' Write Markers - Crumb Cake, Soft Suede, Baja Breeze and Basic Grey, Stamp-A-Ma-Jig and SU Bone Folder.
Card Size: A6.
Top Note Die Easel Post-It Note Holder

Stamps: Just Perfect Alphabet (P.77) and En Francais Background Stamp (P.61).
Cardstock: Chocolate Chip, Baja Breeze and Very Vanilla. DSP - Elegant Soiree.
Inkpad: Baja Breeze. Versamark Stamp Pad.
Accessories: Big Shot, Top Note Die, Scallop Trim Corner Punch, Bone Folder and Post-It Notes.
Easel Card Size: 5" x 6-1/8" when closed/flat.
Both Projects Together

Here are the stamp sets used for today's projects:
En Francais

Simply Said

Just Perfect Alphabet

Something To Celebrate

Here are the projects made by Janet, using the Sunny Garden DSP combo:
Birthday Card

Top Note Die Easel Post-It Note Holder

Both Projects Together

Thanks for stopping by.
Enjoy your weekend.
Alex
Subscribe to:
Posts (Atom)


